I made around 30-40 deployments and spent over 2 hours trying to do this a few days ago, so if you've reached this article from the first page of the Google results, then you're lucky! You'll get to save some time and also find some bonuses at the end of the article :)
Let's first make sure that we're talking about the same thing. There are plenty of resources on the internet that tell you how to use environment variables in Azure Pipelines (or whatever CI/CD you're using), but if the application that needs those variables is running as a Linux service/daemon, then things are a bit different.
Let's say that you have a console application that displays the value of an environment variable like this:
Console.WriteLine($"MyVar: {Environment.GetEnvironmentVariable("MyVar")}");
As you can see, the only thing it does is to display the value of "MyVar", which is an environment variable.
If you follow the official docs, and then you run your app from the terminal, then it will display whatever value you set in Azure Pipelines. In our case, if we set MyVar to 123, it will display something like this:
MyVar: 123
However, once you make sure that the basic stuff works, you'll most likely want to run your app as a service so it will keep running if you close your SSH connection or if you restart the machine. This means that you'll end up creating a service configuration file in /lib/systemd/system like this:
[Unit]
Description=My .NET 5 app

[Service]
WorkingDirectory=/var/www/dotnetapp
ExecStart=dotnet /var/www/dotnetapp/dotnetapp.dll
Restart=always

# Restart service after 10 seconds if the dotnet service crashes:
RestartSec=10
KillSignal=SIGINT
SyslogIdentifier=dotnet-SmartHomeServer.service
User=pi

[Install]
WantedBy=multi-user.target
Once you start the service, you'll notice that the output now is:
MyVar:
This happens because the environment variables you set in Azure Pipelines are not available to the service, which runs in a different environment. In order to fix this, there are 2 main options, and I recommend the second one.
1. Specify your variables in the service description file:
[Unit]
Description=My .NET 5 app

[Service]
WorkingDirectory=/var/www/dotnetapp
ExecStart=dotnet /var/www/dotnetapp/dotnetapp.dll
Restart=always

# Restart service after 10 seconds if the dotnet service crashes:
RestartSec=10
KillSignal=SIGINT
SyslogIdentifier=dotnet-SmartHomeServer.service
User=pi


#Set environment variables
Environment="MyVar=123"


[Install]
WantedBy=multi-user.target
This will work, but this means that the value is hard-coded in the file, so you can't change it from Azure Pipelines. This takes us to our next option:
2. Use an environment file
Instead of manually defining the variables in the service configuration file, we can specify a file path in that same file, and from Azure Pipeline we can write the variable in that file. Now our service configuration file looks like this:
[Unit]
Description=My .NET 5 app

[Service]
WorkingDirectory=/var/www/dotnetapp
ExecStart=dotnet /var/www/dotnetapp/dotnetapp.dll
Restart=always

# Restart service after 10 seconds if the dotnet service crashes:
RestartSec=10
KillSignal=SIGINT
SyslogIdentifier=dotnet-SmartHomeServer.service
User=pi


#Set the path of the file
EnvironmentFile=/home/pi/config/dotnetapp.env


[Install]
WantedBy=multi-user.target
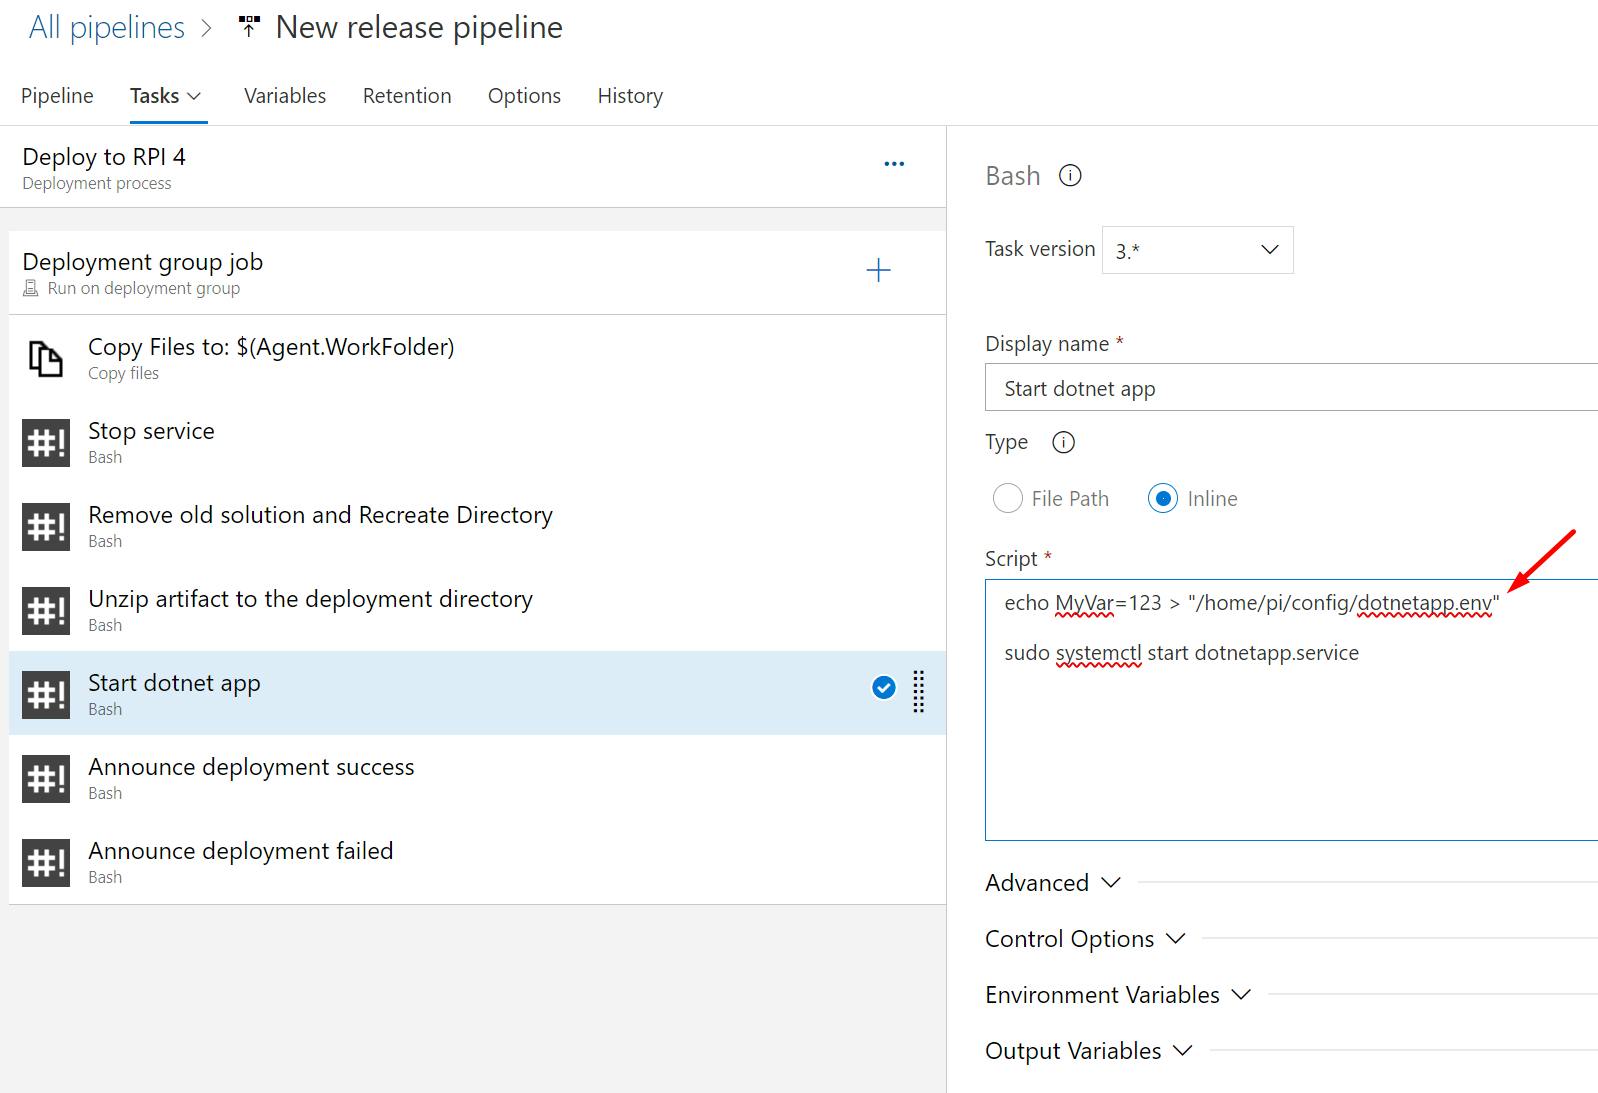
The next step is to write the environment variables from Azure Pipelines to our dotnetapp.env file. To do this, go to your release pipeline, and add this code before you start your app:
echo MyVar=123 > "/home/pi/config/dotnetapp.env"

Once your deployment is complete, you will have a file in this path /home/pi/config/dotnetapp.env with the following content:
MyVar=123
If you check the output of your app, you will see that it uses the value of the environment variable you defined in the Azure Release Pipeline.
Bonus 1
If you want to retrieve the variables using IOptions, then you'll need to name your variables like this (with two underscores):
MySettings__MyVar
and in your class you'll have the property MyVar:
public class MySettings
{
    public string MyVar { get; set; }
}
Bonus 2
If you're asking what I'm deploying to my Raspberry Pi, then you can take a look at this repo, it's a .NET API that does face recognition and sends the results to Home Assistant. For now, I use it to detect my face when I enter my office, so if it's me, then it will turn on my laptop/lights and give me a summary of the day (check out the video below).
